Svenska English

Svenska English
Do-it-yourself monitor cable!
Disclaimer: I did not originally do this myself, since I'm not very good at "hardware hacking". It's my father whose responsible for it originally, and it is a couple of years old... Since a lot of people wanted to know how I did it, I decided to try to understand it, and created this web page. The information may not be correct, and I take no responsibility whatsoever for anything that can go wrong with the design. This works for me. Your mileage may vary.
The audio and 40 column video signal are taken from the "video out" DIN connector. Pin 4 has the video and pin 3 has the audio. Since the C64/C128 only has mono sound (unless you have a dual SID), this output need to be connected to both the left and right inputs of the SCART connector.
The 80 column monochrome signal comes in the same format as the 40 column signal, this is why the simpler devices will give you 40 column plus 80 column monchrome only. The monochrome display is nice for some programs, since it gives a clearer picture on most tvs. The 80 column monochrome video is found on pin 7 of the RGBI DB9 connector.
The colour output is a bit trickier, since it is a 4-bit digital output (RGBI - red, green, blue and intensity), and the SCART inputs three analog inputs (RGB - red, green and blue). But this can be remedied. The schematic below shows a simple way to do it with resistors and potentiometers (the latter are to trim the picture so it looks good on your tv). Please note a typo in the schematic: the 569Ω resistors should really be 560Ω ones as well.
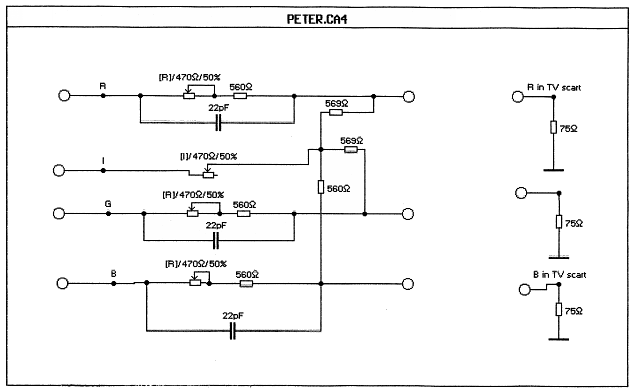
The R, G, B and I inputs on the left of the schematics are those from the DB9 connector labelled RGBI on the C128, pins 3, 4, 5 and 6 respectively.
The R, G and B outputs on the right are connected to the SCART connector, as described below.
Since we're going to connect this device to one SCART connector, we need to be able to switch between the 40 and 80 column modes. This is done with a simple two-way switcher, which selects which one of the video signals to input.
 40 video  *--.
               \
	       switch ----* SCART video input
               /
 80 video  *--'
The normal thing for a TV to do when a SCART cable is connected to it is to take the video input and display it, along with its audio. This is okay for 40 column and 80 column monochrome, but not for our RGB mode. To activate RGB mode, we need to send a signal of 2-3V, 30mA on pin 16 (blanking) on the SCART. In my box, there is simply a 9V battery connected that pin, via a resistor (which I believe is 330 Ohm). It is activated by a switch on the side of my adapter box. Please note that you need to have put the 40/80 switch on the device in 80-column mode, since the TV will read the sync from the video input.
To actually get something in to the TV, you need to connect all the outputs you have created to a SCART connector, which is described here.
This picture describes the pin-out of the SCART connector:
,--+
+---' 20| Video in
Video out |19 |
| 18| Blanking, ground
Video ground |17 |
| 16| Blanking
Red |15 |
| 14| DýB ground
Red ground |13 |
| 12| Communications line DýB
Green |11 |
| 10| Communications line DýB
Green ground |9 |
| 8| Status video
Blue |7 |
| 6| Audio in (left)
Blue ground |5 |
| 4| Audio ground
Sound out (left) |3 |
| 2| Audio in (right)
Sound out (right) |1 |
+---21--+ Ground (case)
Connect these outputs to the SCART connector:
| Signal | SCART pin |
|---|---|
| Video (40/80m after switch) | 20 |
| Audio | 2 and 6 |
| Red | 15 |
| Green | 11 |
| Blue | 7 |
| RGB activation | 16 |
| Ground | 4, 5, 9, 13, 17, 18 |
Hardware projects page | Softwolves' Commodore page | Peter's home page